

Setting up the 16x Output Module
Download as PDF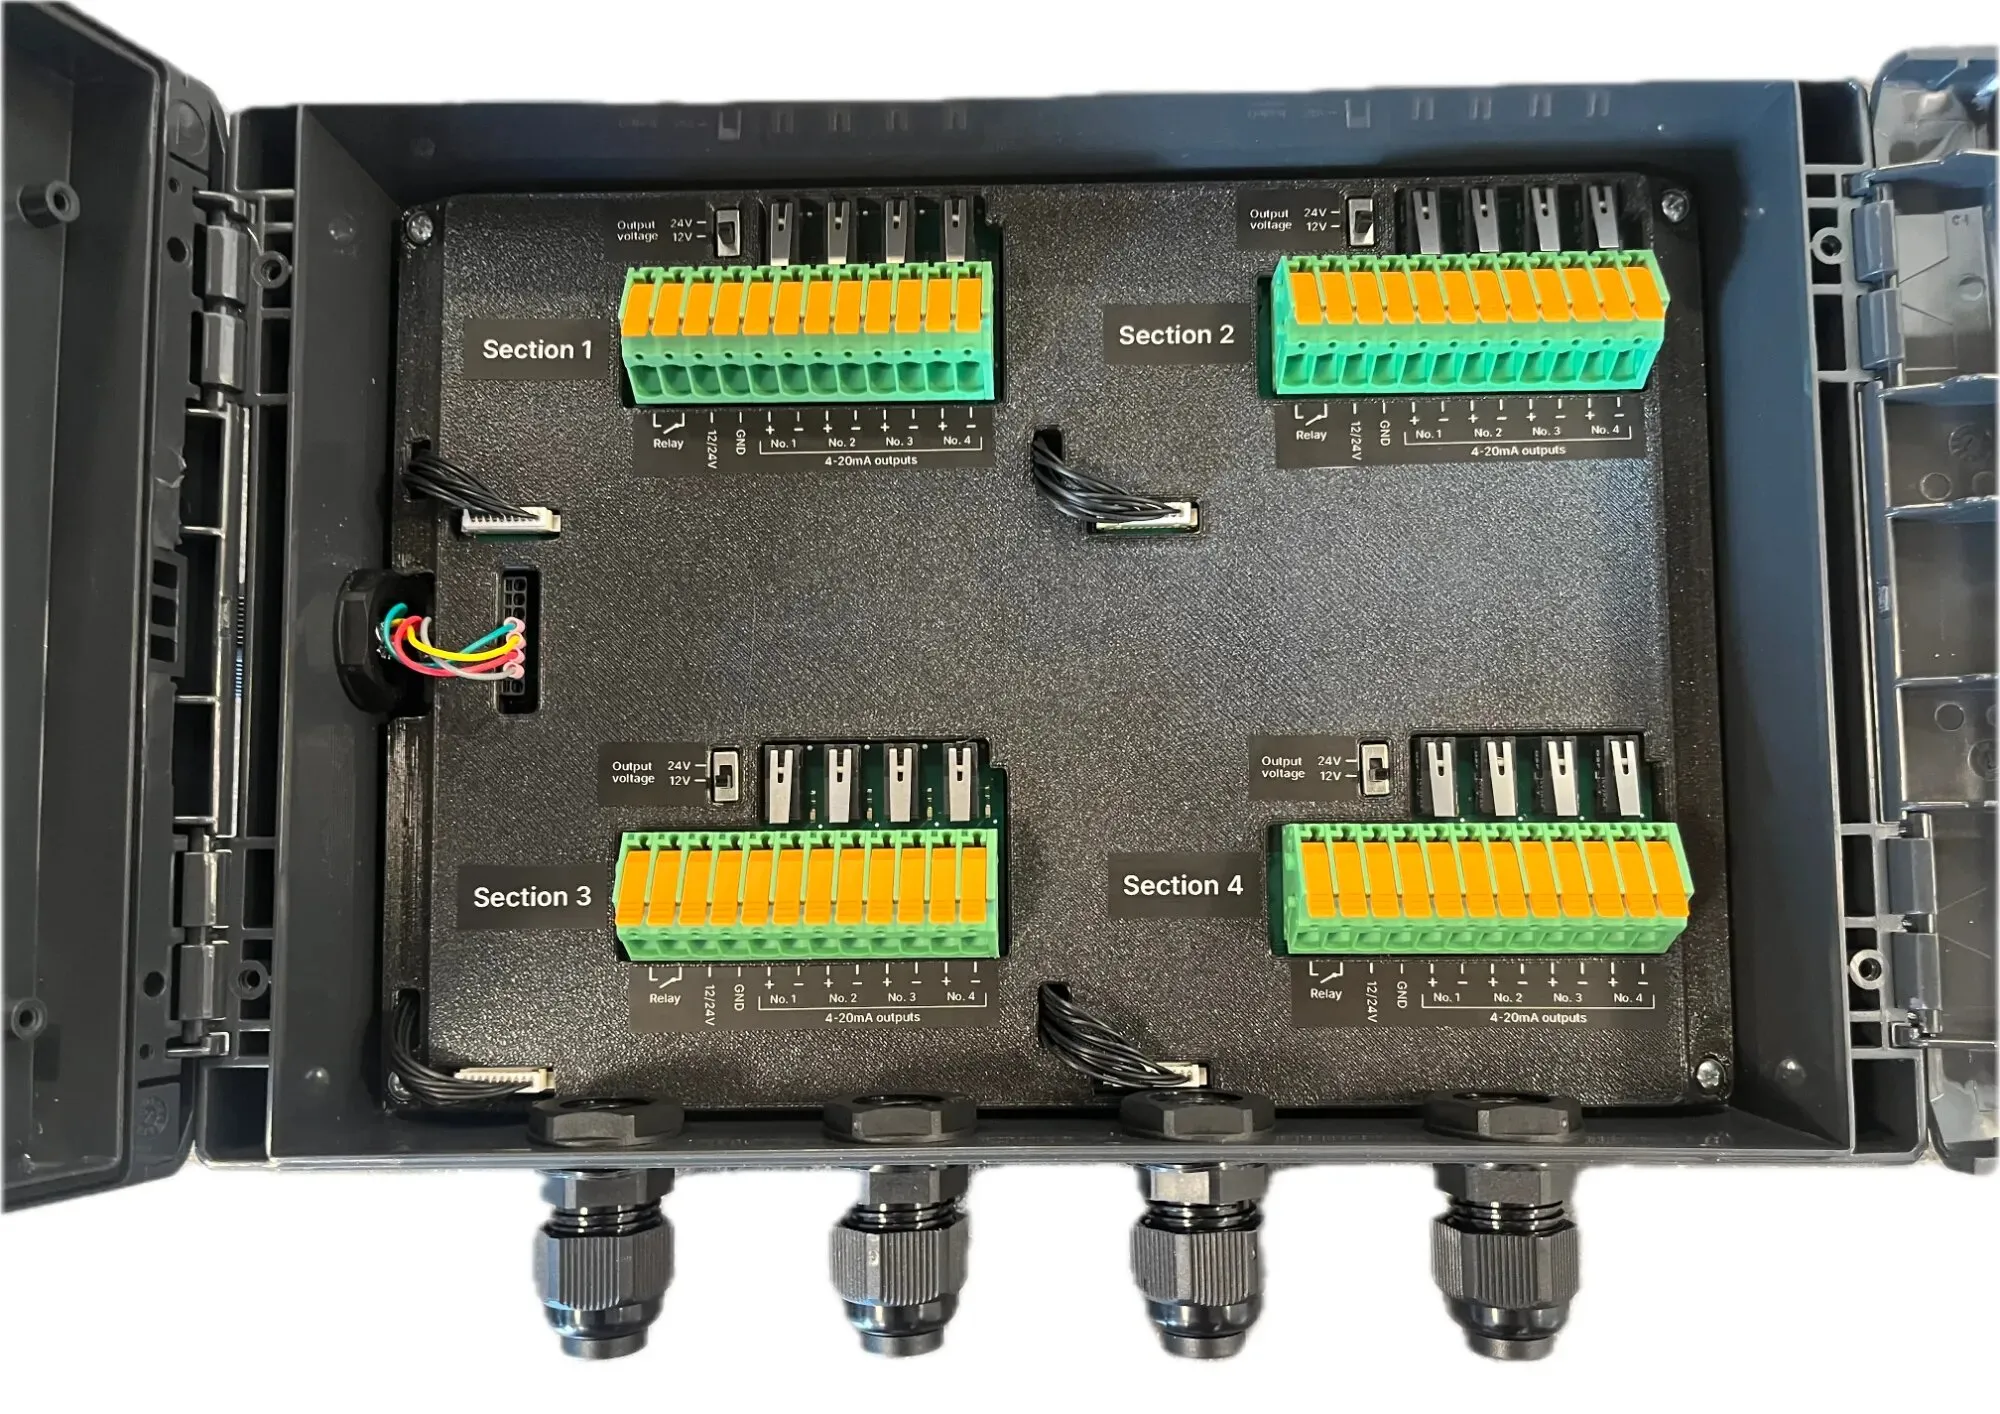
The 16x Output Module is an output module for Logger WD-68. It lets the Logger act on its measurements — locally on the Logger, and remotely from Consibio Cloud — by driving relays and 4-20mA signals to PLCs, SCADA systems, frequency converters and other equipment.
The module is split into four identical sections, marked Section 1 to Section 4 inside the enclosure. Each section provides:
- One relay output that switches the connection between the two Relay terminals. It is a low-power output rated for 30V and 100 mA, so use it to switch a signal line, or to drive the coil of a contactor or larger relay that in turn switches a pump, a valve or a light.
- Four 4-20mA outputs that can drive a 4-20mA signal to any device with a 4-20mA input.
- A 12V or 24V supply output on the 12/24V terminal, which you select with a switch in the section.
- Wiring test buttons that let you verify each 4-20mA loop on-site, without waiting for the Logger to transmit.
In total, that is 4 relay outputs and 16 4-20mA outputs. Each output is mapped to an element in Consibio Cloud, so the outputs can be driven by an automation rule running on the Logger.
Before you start
Section titled “Before you start”- A Logger WD-68 with a free M12 sensor connector (Sensor connector A or Sensor connector B).
- Firmware 3.15.1 or newer on the Logger.
- Edit permissions on the project in Consibio Cloud.
1. Connect the module to the Logger
Section titled “1. Connect the module to the Logger”The 16x Output Module connects to the Logger through one of its M12 sensor connectors — the same connectors you use for sensors. The connection carries both power and data for the module, so it needs no separate power supply.
- Plug the module’s M12 cable into a free sensor connector on the Logger, and tighten the coupling nut by hand.
- Note which connector you used (A or B) — you need it when you configure the module in Consibio Cloud.
2. Parts of a section
Section titled “2. Parts of a section”All four sections are laid out the same way:
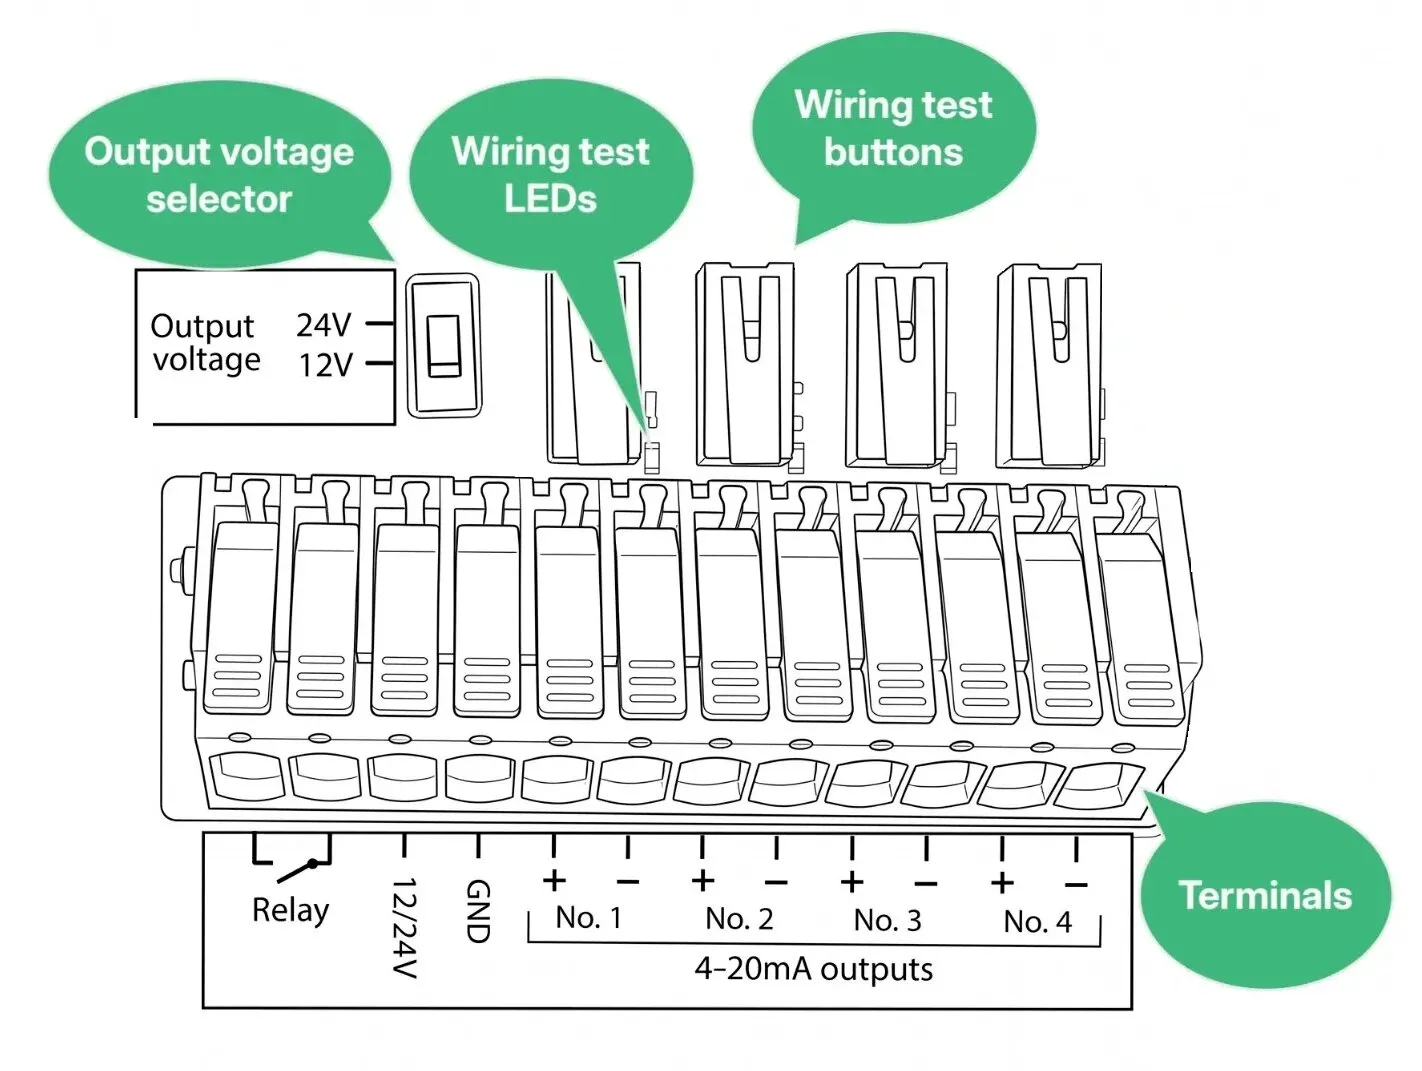
| Part | Description |
|---|---|
| Output voltage selector | Selects whether 12V or 24V is generated on the 12/24V terminal of that section. Set it before wiring anything to that terminal. |
| Terminals | The 12-pole pluggable terminal block that carries the relay output, the supply output and the four 4-20mA outputs of the section. |
| Wiring test buttons | One button per 4-20mA output. Press a button to test whether that loop is wired correctly. |
| Wiring test LEDs | The LED next to a test button lights up while the button is pressed if the corresponding 4-20mA loop is wired correctly. |
Terminals
Section titled “Terminals”The terminals in each section are numbered from left to right, with the terminal block facing you as in the drawing above:
| No. | Terminal | Description |
|---|---|---|
| 1 | Relay | Relay terminal 1 |
| 2 | Relay | Relay terminal 2 |
| 3 | 12/24V | Supply output, 12V or 24V as chosen with the output voltage selector |
| 4 | GND | Ground, common with the Logger |
| 5 | No. 1 + | 4-20mA output no. 1, positive |
| 6 | No. 1 – | 4-20mA output no. 1, negative |
| 7 | No. 2 + | 4-20mA output no. 2, positive |
| 8 | No. 2 – | 4-20mA output no. 2, negative |
| 9 | No. 3 + | 4-20mA output no. 3, positive |
| 10 | No. 3 – | 4-20mA output no. 3, negative |
| 11 | No. 4 + | 4-20mA output no. 4, positive |
| 12 | No. 4 – | 4-20mA output no. 4, negative |
The terminal blocks are pluggable: pull one out of the module, wire it on the bench, and plug it back in when you’re done.
Route your cables into the enclosure through the cable glands in the bottom, and tighten the glands around the cables when you have finished wiring.
3. Wire the relay outputs
Section titled “3. Wire the relay outputs”Each section’s relay switches the connection between its two Relay terminals (terminals 1 and 2). The relay itself doesn’t supply any power — it only opens and closes the circuit you wire through it, exactly like a switch.
Ratings
Section titled “Ratings”| Parameter | Value |
|---|---|
| Maximum switching voltage | 30V |
| Maximum continuous current | 100 mA |
Switch an external power source
Section titled “Switch an external power source”To switch an external power source within the ratings above, break the supply line and run it through the two relay terminals:
- Wire the positive conductor from the external power source to Relay terminal 1.
- Wire Relay terminal 2 on to the positive input of the equipment you want to switch.
- Wire the return conductor from the equipment directly back to the external power source — it does not pass through the module.
When the relay is closed, the circuit is complete and the equipment is powered. When it is open, the circuit is broken.
4. Wire the 4-20mA outputs
Section titled “4. Wire the 4-20mA outputs”The 4-20mA outputs are passive (loop-powered): the module regulates how much current flows through the loop, but it does not supply the loop with power. The loop needs an external power supply, which is normally the device that receives the signal (a PLC or SCADA input, for example).
Wire a passive loop
Section titled “Wire a passive loop”For each output you want to use:
- Wire the positive terminal of the loop power supply to the + terminal of the output (terminal 5, 7, 9 or 11).
- Wire the – terminal of the output (terminal 6, 8, 10 or 12) to the positive input of the receiving device.
- Wire the negative input of the receiving device back to the negative terminal (0V) of the loop power supply.
The module, the receiving device and the power supply are now in series in a single loop. Watch the polarity: the module only regulates current that flows into + and out of –.
Drive a loop actively
Section titled “Drive a loop actively”If the receiving device cannot supply the loop, you can power the loop from the module itself by using the section’s 12/24V output as the loop supply:
- Set the section’s output voltage selector to the voltage the loop needs (12V or 24V).
- Fit a jumper wire from the 12/24V terminal (terminal 3) to the + terminal of the output you want to use.
- Wire the – terminal of that output to the positive input of the receiving device.
- Wire the negative input of the receiving device back to the GND terminal (terminal 4) of the same section.
Test the wiring
Section titled “Test the wiring”Each 4-20mA output has a wiring test button with an LED next to it. Press the button for an output: if the LED lights up, that loop is complete and wired with the correct polarity. If the LED stays dark, the loop is broken or reversed.
Check the following if an LED stays dark:
- The + and – wires are swapped.
- The loop power supply is off, or the receiving device does not power the loop.
- A wire is loose in the terminal block, or the terminal block is not fully plugged into the module.
- For an actively driven loop: the jumper between 12/24V and the + terminal is missing, or the return wire does not reach GND in the same section.
Test each loop before closing the module — it is much faster than diagnosing the wiring from Consibio Cloud afterwards.
5. Set up the 16x Output Module channel
Section titled “5. Set up the 16x Output Module channel”All outputs of the module — in all four sections — are configured in a single 16x Output Module channel on the sensor connector the module is plugged into.
- Go to v3.consibio.cloud and open your project.
- Open Devices and select the Logger the module is connected to. See Claiming a device if the Logger is not in your project yet.
- Scroll down to Inputs and outputs and find the sensor connector you plugged the module into (Sensor connector A or Sensor connector B).
- Next to that connector’s heading, select Add. The Add new channel window opens.
- In Select channel type, choose 16x Output Module.
- The channel has 20 sub-channels — five per section, matching the
Section 1 to Section 4 labels in the module:
- Section 1: Relay, Section 1: 4-20mA no. 1 to Section 1: 4-20mA no. 4
- Section 2: Relay, Section 2: 4-20mA no. 1 to Section 2: 4-20mA no. 4
- … and likewise for Section 3 and Section 4.
- For each output you have wired, use Send to element to select the element that should drive it, or create a new one. Leave the outputs you are not using empty.
- Select Save.
You don’t need to set a unit: Base unit is fixed to % for all sub-channels, and Parameter type is fixed to 4-20mA for the 4-20mA outputs.
Relay values
Section titled “Relay values”The relay state is expressed as a percentage:
- 50% or above closes the relay.
- Below 50% opens the relay.
4-20mA values
Section titled “4-20mA values”The output value is expressed as a percentage of the 4-20mA span:
| Value | Current |
|---|---|
| 0% | 4 mA |
| 50% | 12 mA |
| 100% | 20 mA |
Values outside 0-100% are limited to the nearest end of the range.
Two special cases are worth knowing:
- If the element mapped to an output has no value, the module drives 3.7 mA. This is the transmitter failure signal defined by NAMUR NE43, so the receiving device can tell a missing value apart from a genuine 4 mA reading.
- If an output has no element assigned, it is not driven at all, and a loop wired to it reads 0 mA.
6. Drive the outputs
Section titled “6. Drive the outputs”When you map a sub-channel of the 16x Output Module to an element, that element becomes an output element in Consibio Cloud. Output elements are driven by an automation rule, which you set up in the project and point at the element through its Output element setting. In the rule’s Output type setting, you choose how the output is determined:
- Fixed output — outputs a value you define, optionally following a dynamic sequence over time.
- On/Off controller — switches the output depending on whether a measured value is above or below a setpoint, with a configurable deadzone.
- PID controller — regulates the output continuously towards a setpoint.
- Triggered pulse output — sets the output to 100% for a short period when a measured value crosses a threshold.
- Follow sensor — makes the output follow a measured value proportionally. See Making an output follow a sensor.
Automation rules run locally on the Logger, so the outputs keep working between transmissions and while the Logger is offline.
Troubleshooting
Section titled “Troubleshooting”- A wiring test LED stays dark — the loop is broken or the polarity is reversed. See Test the wiring.
- The receiving device reads 3.7 mA — the element mapped to that output has no value. Check that an automation rule is driving the element.
- A wired loop reads 0 mA — the output has no element assigned in the 16x Output Module channel.
- 16x Output Module is missing from the channel type dropdown — the Logger’s firmware is older than 3.15.1, or the Logger’s hardware does not support the module. Update the firmware, and contact support if the option is still missing.
- None of the outputs respond, or the channel reports an error — the Logger cannot reach the module. Check that the M12 cable is fully seated and tightened on the Logger, and that the channel is added under the sensor connector the module is actually plugged into.
- Only the outputs in one section respond incorrectly — check the wiring and the output voltage selector in that section, and that you mapped the elements to that section’s sub-channels.
Reach out to support@consibio.com if you need assistance.